Tutorial: How to leverage Adobe Targets Category Affinity feature

What I always miss in Adobe tutorials and documentation is an end-to-end description of individual features and how they actually interact in the Experience Cloud. These are described well in their individual parts, but when it comes to integrating them in the Experience Cloud, you often don't find much.
This tutorial is intended for AEM / Adobe Target / Adobe Launch rookies and should help to use the Adobe Target feature "Category Affinity".
What is the goal: As a marketer, I would like to identify the interests of my customers via their surfing behaviour on my website, put these customers into segments and finally serve these with personalised content.
In that tutorial, we will use our own website.
We will leverage AEM, Adobe Launch and the Category Affinity Feature within Adobe Target.
What will be covered:
- Creating Adobe Launch Data Elements
- Using the Matching Table Extension in Adobe Launch
- Creating "Category Affinity" Audiences in Adobe Target
- Creating a simple Adobe Target Activity
Category Affinity 101
What is the Adobe Target feature "Category Affinity"?
When we recently relaunched comwrap.com with AEM we wanted to showcase the power of Adobe Target in a very simplified case. The intention was not to generate more leads via personalisation but to show what you can do by leveraging Adobe Target.
We wanted to show a different Hero Teaser depending on your interest in a specific comwrap topic:
- Show a commerce Teaser, when you show interest in Adobe Commerce (Magento)
- Show an AEM Teaser, when you show interest in the Adobe Experience Cloud
- Show an Ibexa Teaser, when you show interest in the Ibexa DXP. Ibexa is an alternative "DXP-Universe" comwrap is covering.
In order to show the right teaser to the right customers, we leverage the Category Affinity feature.
"The category affinity feature in Adobe Target automatically captures the categories a user visits and then calculates the user’s affinity for the category so it can be targeted and segmented on. Category affinity helps to ensure that content is targeted to visitors who are most likely to act on that information." See the official documentation for more details.
Simply speaking: Each time a user visits a page where certain affinity categories are attached, a "Category Affinity" is generated.
Example: A user visits our Adobe Commerce page we give them the affinity category "Adobe Commerce". If the user visits more pages containing Adobe Commerce information, let's say this blog post, the commerce affinity gains even more "points". If the user then visits pages about AEM the "AEM-Affinity" gains some points. At that moment the featured/first affinity is "Adobe Commerce" and the second affinity is "AEM". If the user now visits more and more pages containing AEM information eventually the "AEM-Affinity" will overtake the "Commerce-Affinity" and the user will end up with the "AEM-Affinity" as a featured/first affinity and "Adobe-Commerce" as the second affinity.

Step by Step guide
Let me give you a step by step guide to leveraging the Category Affinity feature.
1. Setup the categories/interests/affinities for each page
First, we need to capture the interest. While reading through the documentation you might have noticed that somehow we need to get the affinities into the mbox parameter "user.categoryId", to pass the info to Adobe Target.
We decided to go with the standard AEM Tags. We went to each AEM page/blogpost which contains Adobe Commerce information and tagged them with "Adobe Commerce".
The tags appear in the 'keywords' section of the source code, like this:

2. Send the affinities via Adobe Launch to Adobe Target
In order to get the affinities to Adobe Target, we leverage Adobe Launch.
In Adobe Launch we will create two Data Elements. "Category Affinity" and "Affinity Match Table".
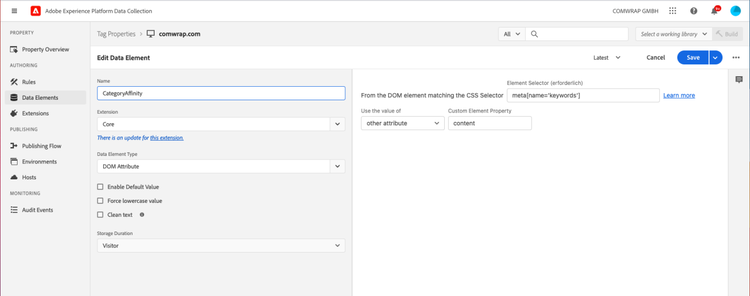
To pass the AEM Tags into Adobe Launch we create a new Data Element "Category Affinity". In there we grab the meta keywords from the DOM via the CSS Selector meta[name='keywords'].
The Custom Element Property is "content". In the end, it should look like this:
Why do we need an additional Data Element "Affinity Match Table"?
Since we used the AEM Tags for our Category Affinity we need to clean them up.
We want to use the keywords not just for the affinity rule, but also for enhanced SEO and to find the pages more easily in AEM. Also, we leverage these Tags for some custom components.
Since we have other use cases for the Tags we have set e.g. the following tags for the Adobe Commerce page: Adobe Commerce, Magento Commerce.
If we would pass these two tags without a cleanup to Adobe Target it would create two category affinities. 1: Adobe Commerce 2: Magento Commerce.
Since they should count as one affinity we leverage the Adobe Launch Extension Mapping Table.
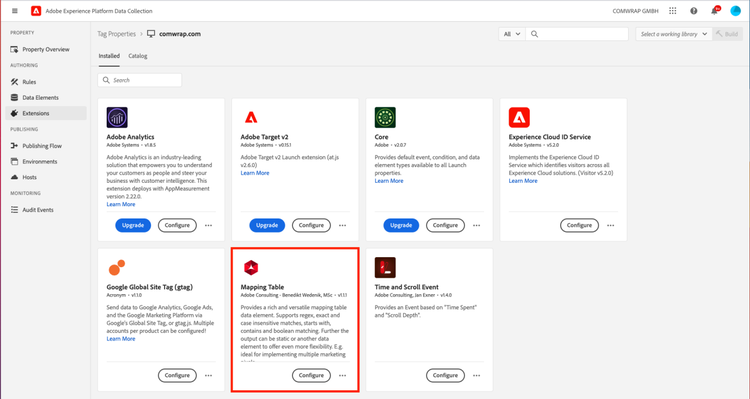
The screenshot below shows what that extension does:
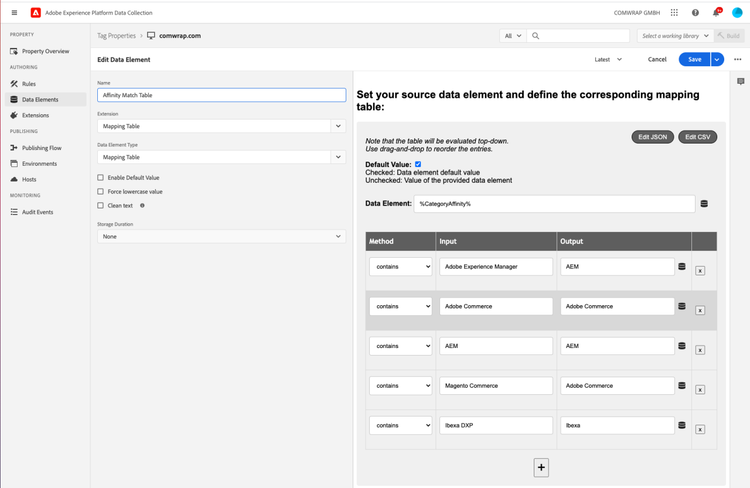
In Adobe Launch you create a new Data Element leveraging the Mapping Table Extension.
In there we map the meta keywords (AEM Tags) to the actual Category Affinities.
Examples:
- Adobe Experience Manager, AEM -> AEM
- Adobe Commerce, Magento Commerce -> Adobe Commerce
As Data Element you choose the Category Affinity Data Element you created beforehand.
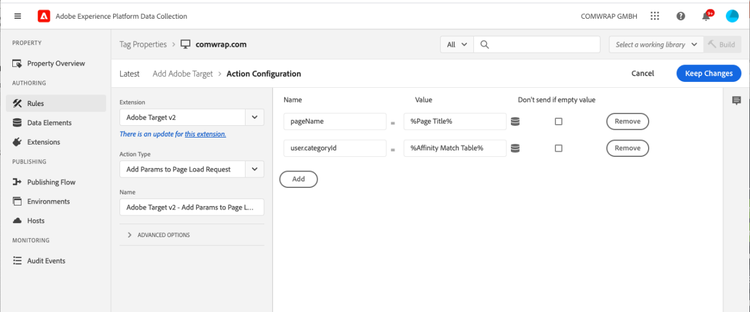
Next you go to your Adobe Launch Rules and add the user.categoryId to the newly created Matching Table Parameter.
That should look like this:
Publish the two data elements and the new/updated rule.
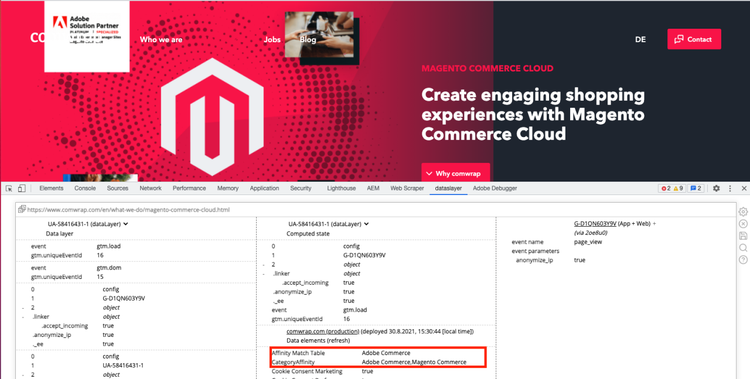
Once published use your favourite debugger tool and see if the category affinity is set correctly.
We use the dataslayer Google Chrome Extension:
3. Setup the Adobe Target Audience and Activity
In the next step we want to create the Adobe Target Audience and in the final step create the personalised experience.
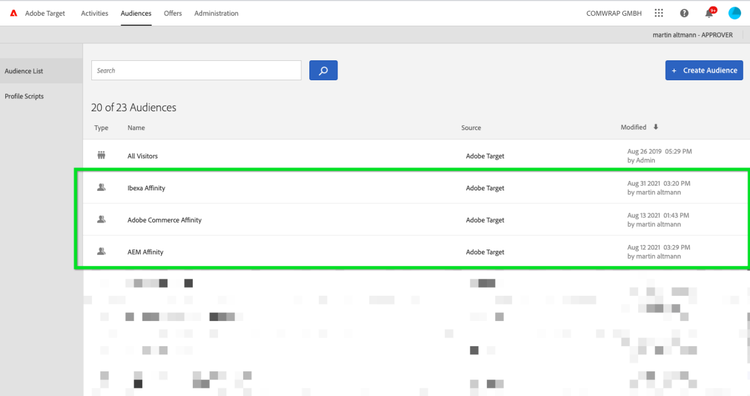
Log in to Adobe Target and go to Audiences.
In there create three audiences. For our case that was:
- Ibexa Affinity
- Adobe Commerce Affinity
- AEM Affinity
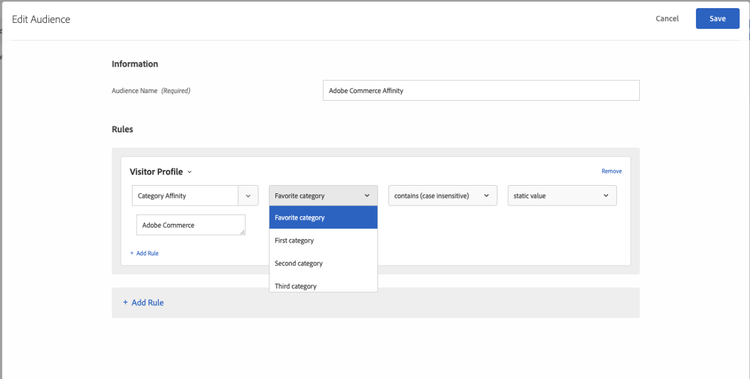
- For each of the Audiences choose Visitor Profile -> Category Affinity.
- Choose "Favorite category" to target the highest-scoring Category Affinity
- Choose "contains"
- Choose "static value"
- As the value choose the value you have set up within the matching table extension in the Output field.
That should look like this:
Within Adobe Target go to Activities and create a new Experience Targeting activity.
As you can see below we created one activity including all audiences (AEM, Commerce, Ibexa):
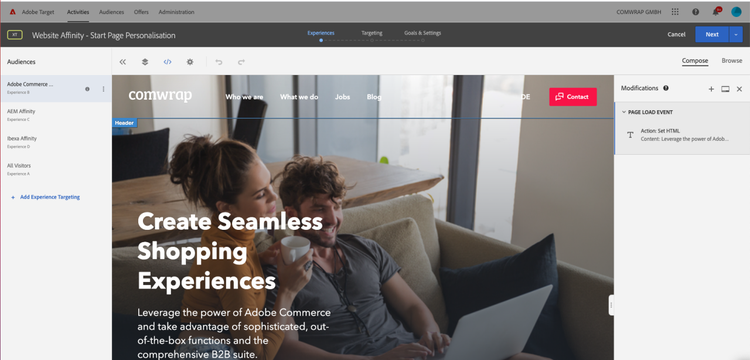
As the goal metric, we choose the click on the red Contact button on the top right corner.
Bring it all online and have fun.
If you want to see that in action
- Go to our homepage and check the teaser.
- Go to our Adobe Commerce page and refresh a couple of times to get a proper affinity score.
- Go back to our homepage and check the teaser. It should have changed to the Adobe Commerce Teaser.
Feel free to contact me on LinkedIn if you have any questions.
Swipe through the gallery to see the different personalisation outcomes:




Photo by George Pagan III on Unsplash